Automating Mill Test Reports
What is a Mill Test Report
A mill test report (MTR) often also called a certified mill test report, certified material test report, mill test certificate (MTC), inspection certificate, or certificate of test, is a quality assurance document used in the metals industry, that certifies the material’s chemical and physical properties, and states that the product complies with international standards such as ASTM, ASME, ISO, etc.
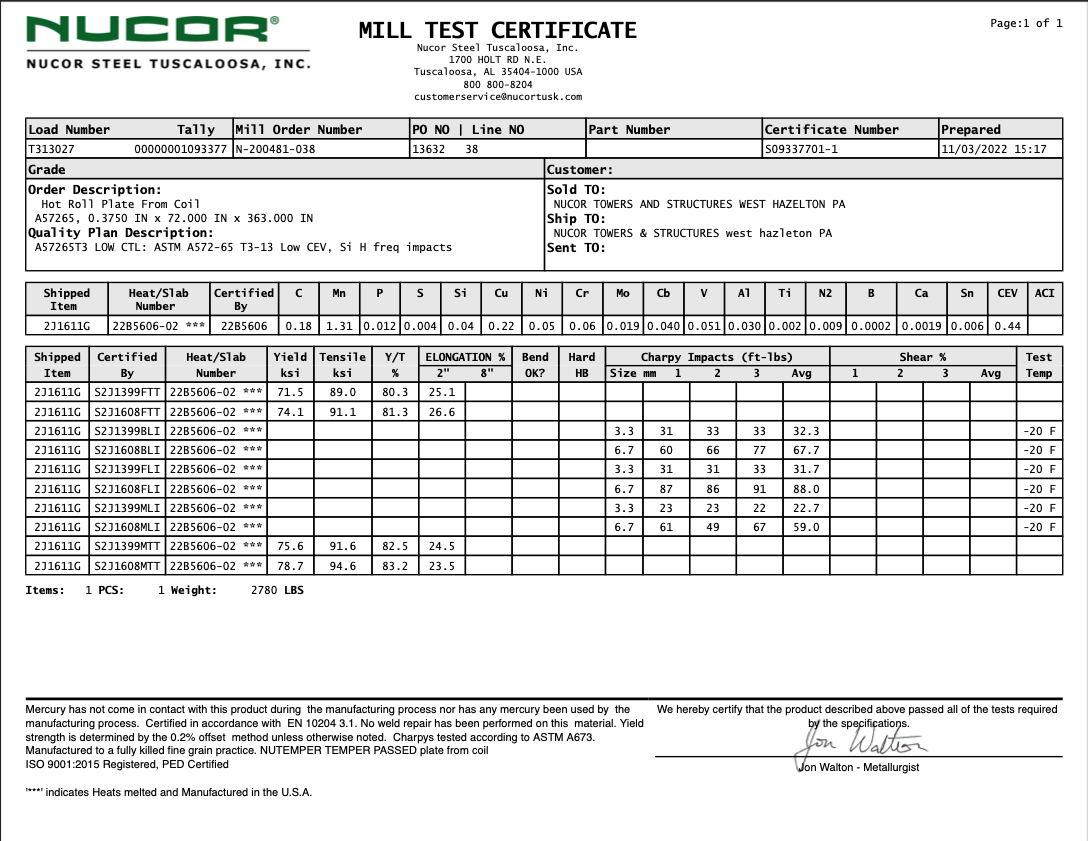
A mill test report is typically generated by the mill that created the material and is done by performing a variety of mechanical stresses/breaks, and mass spectrometry. The report will show the elemental weights as carbon, phosphorus, silicon, etc, and the results of various mechanical tests. The material is tracked through unique identifiers such as its Heat ID or some Item/product ID. to the front matter of the post. The table of contents will be automatically generated from the headings in the post.
sample image

Challenges
Whether a business is manufacturing, redistributing, or making parts from metals, it becomes incumbent upon that business to certify or re-certify that the Material Test Report complies with the designation i.e ASTM A 572/572M - 21. When a customer receives this document, usually as part of their receiving packet, they must validate that the data contained from the mill or third party is accurate and must re-certify the MTR. This is done for a large variety of reasons including:
- Ensure that the material doesn’t fail mechanically.
- Proof to secure bids or contracts.
- Early problem detection.
- Negotiate pricing on un-compliant materials.
- Prevent liability or litigation in the event of material failure.
This use case is largely motivated by loss avoidance and government regulation, and the “re-certification” process is slow and at risk of error. The recertification of an MTR is typically performed by a knowledge worker, metallurgist, or material engineer; often this process is done manually, by locating the material standard, designation, type on the MTR, and the reference document published by the international body.
ASTM is one of the internationial standard bodies, and is the most common we see in our practice. Let’s breakdown the ASTM Desigtnation System using the following example.
ASTM A 516/ A 516M-90 (2001) Grade 70 - Pressure Vessel Plates, Carbon Steel, for Moderate and Lower Temperature Service
- The “A” describes a ferrous metal, but does not subclassify it as cast iron, carbon steel, allow steel, or stainless steel.
- 516 is a sequential number without any relationship to the metal’s properties.
- The “M” indicates that the standard A 516M is written in rationalized SI untis (Metric). Therefore A 516/A 516M uses both inch-pound and SI untis.
- 90 indicates the year of adoption or last revision.
- (2001) is the year of last reapproval
- Grade 70 indicates the minimum tensile strength in ksi.
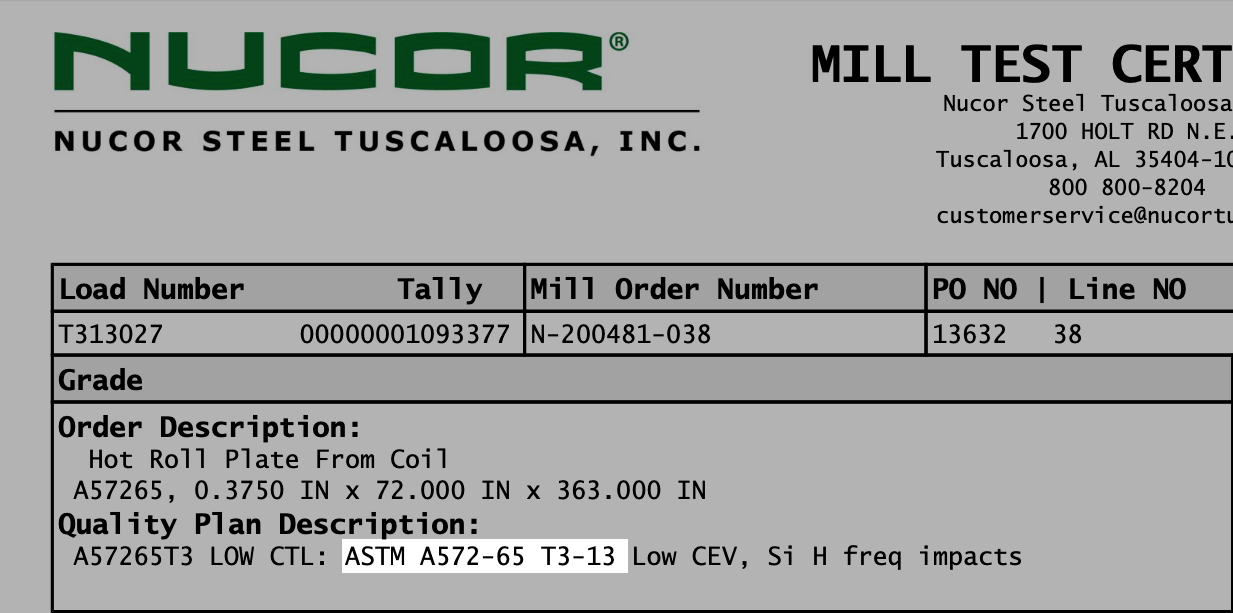
So let’s look at our example in this image.

In this example we see standard is ASTM, the designation is A 572, the grade is 65 [450], the type is 3, and the year is 2013. So our worker refers to the documentation for the standard. the standard must be purchased again from the international body i.e. ASTM every time there is a new revision, usually 3 years. Clients often prefer to certify to the latest year they have, and not the year found on the document.
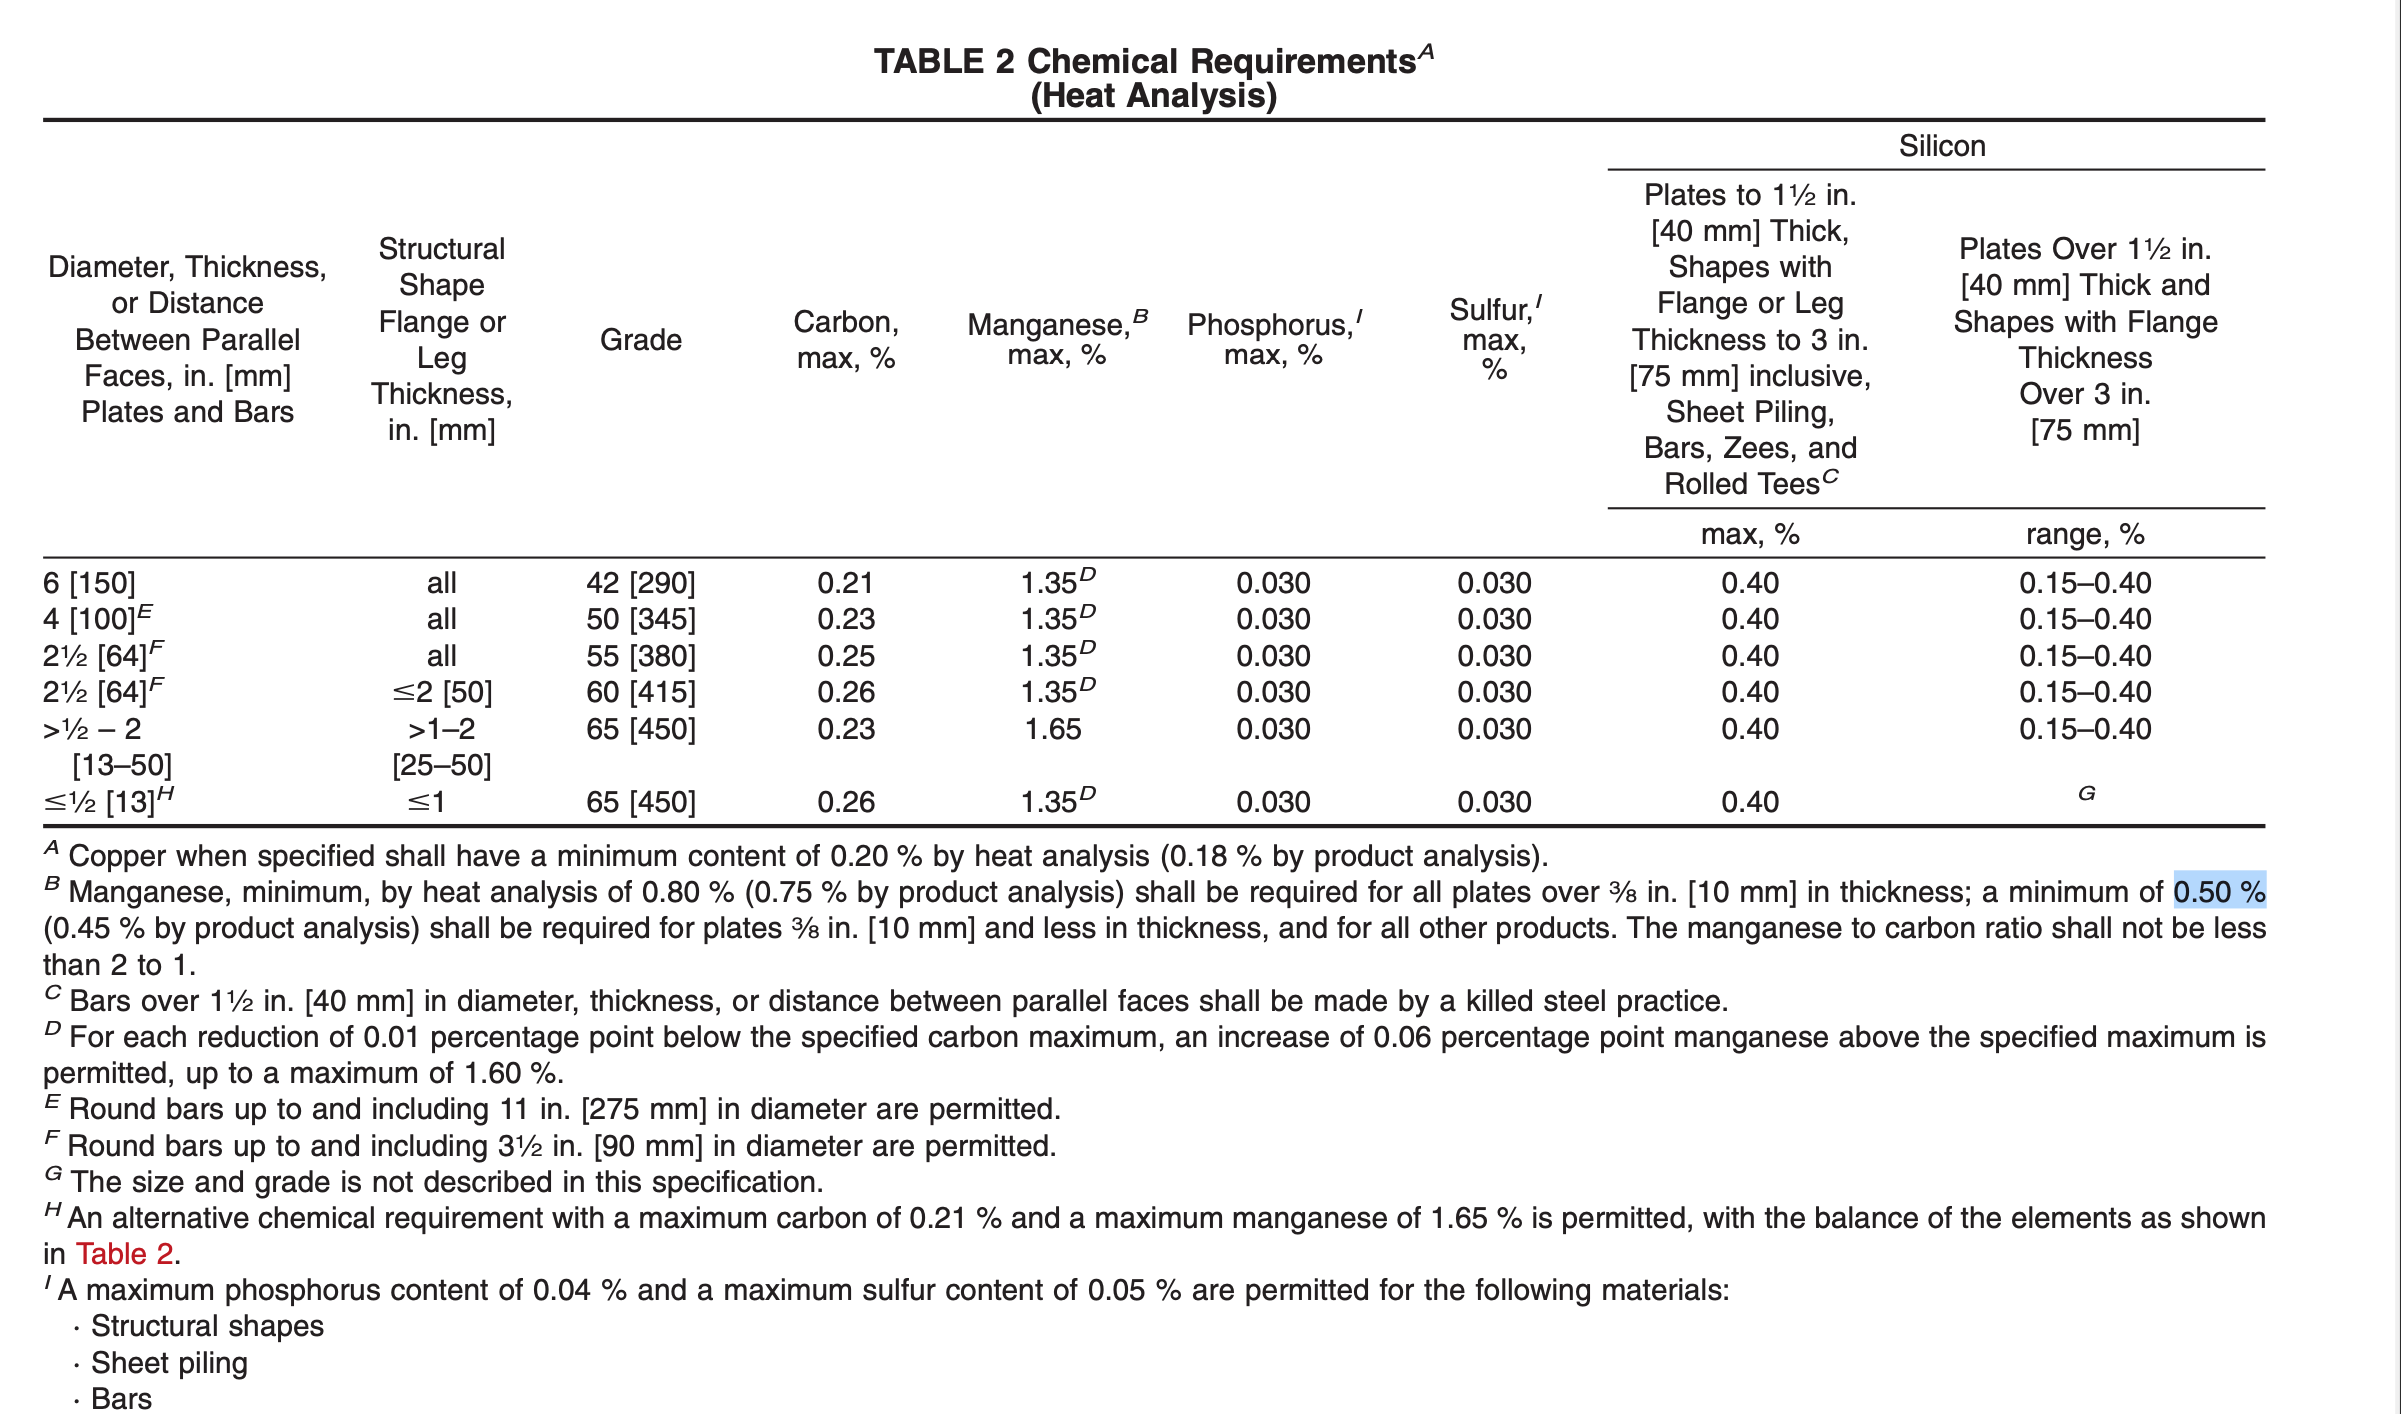
Here is part of the ASTM A 572/A 572M - 21, that would allow a worker to determine if this MTR’ Major elements are accurate.

The current way of validating is 100% manual reading both the MTR and the Designation document and checking that the chemistry or property is valid. Some organizations have developed they’re own excel spreadsheets that have validation rules, but the process is still manual, error prone, and slow.
However, if we read more carefully we can see there are nuances regarding Manganese.
B Manganse, minimum by heat analysis of 0.80 % (0.75 % by product analysis) shall be required for all plates over 3/8 in. [10 mm] in thickness; a minimum of 0.50 % (0.45 % by product analysis) shall be required for plates 3/8 in. [10 mm] and less in thickness, and for all other products. The manganese to carbon ratio shall not be less than 2 to 1.`
D For each reduction of 0.01 percentage point below the specified carbon maximum, an increase of 0.06 percentage point manage above the specified maximum is permitted, up to a maximum of 1.60.
The standards that yield from an international body are many and complex bringing in they’re own sets of complexity and matricices.
After reading several dozen of these standard designations, I believe we can ontologically breakdown
Standard Bodies
ASTM International (ASTM)
Formerly known as the American Society for Testing and Materials, ASTM is a globally recognized leader in the development and delivery of international voluntary consensus standards, including those for steel.
International Organization for Standardization (ISO)
ISO develops and publishes international standards for a wide range of industries, including the steel industry. ISO standards for steel cover everything from material properties to testing methods.
European Committee for Standardization (CEN)
CEN is responsible for developing European Standards (ENs) across various sectors, including steel. CEN standards are recognized across Europe and often harmonize with or complement ISO standards.
More strandard bodies:
- International Electrotechnical Commission (IEC)
- American Iron and Steel Institute (AISI)
- Japanese Industrial Standards Committee (JISC)
- Deutsches Institut für Normung (DIN)
- British Standards Institution (BSI)
- Russian Federal Agency on Technical Regulating and Metrology (Rosstandart)
- Bureau of Indian Standards (BIS)
- China Iron and Steel Association (CISA)
- Association Française de Normalisation (AFNOR)
- Standards Australia
- Standards Council of Canada (SCC)
Many MTRs have multiple ways of presenting data, some tables are combined often to condense information on the page, as shown with the documents

You can see that some of the properties like Shear are itterative this is not always the case, but we want to model the data in a way that could cover most MTRs
Tests
Chemistry
Click to see sample table
| C | Mn | Si | P | S | Cr | Ni | Mo | Cu | Ti | V | N | N2 | Al | Ca | B | Sn | As | Sb | Zr | Nb | Co | Pb | Fe | Bi | Ta | Zn | Se | W | Ce | La | Mg | Ag | H | O | Be | Ga | Hf | In | Li | Re | Ru | Te | Y | Yb | MnS | WC | TiC | CEQ | CI |
|---|---|---|---|---|---|---|---|---|---|---|---|---|---|---|---|---|---|---|---|---|---|---|---|---|---|---|---|---|---|---|---|---|---|---|---|---|---|---|---|---|---|---|---|---|---|---|---|---|---|
| 0.20 | 1.00 | 0.30 | 0.015 | 0.005 | 0.50 | 0.40 | 0.25 | 0.30 | 0.010 | 0.005 | 0.01 | 0.002 | 0.005 | 0.001 | 0.002 | 0.10 | 0.05 | 0.002 | 0.001 | 0.002 | 0.010 | 0.001 | Bal | 0.0001 | 0.001 | 0.001 | 0.005 | 0.002 | 0.003 | 0.001 | 0.005 | 0.001 | 0.002 | 0.0001 | 0.002 | 0.002 | 0.001 | 0.002 | 0.001 | 0.002 | 0.001 | 0.002 | 0.002 | 0.002 | 0.002 | 0.002 | 0.002 | 0.02 | 0.002 |
Major Elements
These elements are present in significant quantities and define the primary composition of the material.
- C (Carbon)
- Mn (Manganese)
- Si (Silicon)
- P (Phosphorus)
- S (Sulfur)
Alloying Elements
These elements are added to impart specific properties to the material, such as strength, hardness, or corrosion resistance.
- Cr (Chromium)
- Ni (Nickel)
- Mo (Molybdenum)
- Cu (Copper)
- Ti (Titanium)
- V (Vanadium)
- Nb (Niobium)
- Co (Cobalt)
- W (Tungsten)
- Ta (Tantalum)
- Zr (Zirconium)
- Re (Rhenium)
- Hf (Hafnium)
Microalloying Elements
These are added in very small amounts to refine the grain size and improve the mechanical properties.
- N (Nitrogen)
- B (Boron)
- Ca (Calcium)
- Al (Aluminum)
Impurities and Tramp Elements
These elements are typically present in very small amounts and can adversely affect the properties if not controlled.
- Pb (Lead)
- Bi (Bismuth)
- Sb (Antimony)
- As (Arsenic)
- Sn (Tin)
- O (Oxygen)
- H (Hydrogen)
- Se (Selenium)
- Te (Tellurium)
- Li (Lithium)
- In (Indium)
Residual and Trace Elements
These elements are typically present in trace amounts as a result of the raw materials used in the manufacturing process.
- Zn (Zinc)
- Ag (Silver)
- Mg (Magnesium)
- Ce (Cerium)
- La (Lanthanum)
- Y (Yttrium)
- Yb (Ytterbium)
- Ru (Ruthenium)
- Ga (Gallium)
Special Considerations
Some elements may have specific designations based on their role or required precision in certain applications.
- MnS (Manganese Sulfide)
- WC (Tungsten Carbide)
- TiC (Titanium Carbide)
- CEQ (Carbon Equivalent)
Tensile Properties
Click to see sample table
| Heat ID | Length | Temp | Direction | Yield Strength1 | Yield Strength2 | Yield Strength3 | Yield StrengthAvg | UTS1 | UTS2 | UTS3 | UTSAvg | Elongation1 | Elongation2 | Elongation3 | ElongationAvg | ROA1 | ROA2 | ROA3 | ROAAvg | MOE1 | MOE2 | MOE3 | MOEAvg |
|---|---|---|---|---|---|---|---|---|---|---|---|---|---|---|---|---|---|---|---|---|---|---|---|
| A123 | 100 mm | 20°C | Longitudinal | 450 MPa | 460 MPa | 455 MPa | 455 MPa | 600 MPa | 610 MPa | 605 MPa | 605 MPa | 20% | 21% | 20.5% | 20.5% | 40% | 41% | 40.5% | 40.5% | 210 GPa | 215 GPa | 212 GPa | 212 GPa |
Charpy Impact Test
Click to see sample table
| Heat ID | Length | Temp | Direction | Energy1 | Energy2 | Energy3 | EnergyAvg | Shear1 | Shear2 | Shear3 | ShearAvg | Lateral Expansion1 | Lateral Expansion2 | Lateral Expansion3 | Lateral ExpansionAvg |
|---|---|---|---|---|---|---|---|---|---|---|---|---|---|---|---|
| A123 | 10 mm | -20°C | Transverse | 12 J | 15 J | 14 J | 13.67 J | 60% | 62% | 61% | 61% | 0.5 mm | 0.6 mm | 0.55 mm | 0.55 mm |
Bend Test
Click to see sample table
| Heat ID | Length | Temp | Direction | Angle1 | Angle2 | Angle3 | AngleAvg | Radius1 | Radius2 | Radius3 | RadiusAvg |
|---|---|---|---|---|---|---|---|---|---|---|---|
| A123 | 100 mm | 20°C | Longitudinal | 90° | 92° | 91° | 91° | 10 mm | 11 mm | 10.5 mm | 10.5 mm |
Hardness Test
Click to see sample table
| Heat ID | Length | Temp | Direction | HRC1 | HRC2 | HRC3 | HRCAvg | HRB1 | HRB2 | HRB3 | HRBAvg | Brinell1 | Brinell2 | Brinell3 | BrinellAvg | Vickers1 | Vickers2 | Vickers3 | VickersAvg |
|---|---|---|---|---|---|---|---|---|---|---|---|---|---|---|---|---|---|---|---|
| A123 | 10 mm | 20°C | Random | 45 | 46 | 45.5 | 45.5 | 85 | 86 | 85.5 | 85.5 | 250 | 255 | 252.5 | 252.5 | 500 | 505 | 502.5 | 502.5 |
BDWTT
Click to see sample table
| Heat ID | Length | Temp | Direction | Shear Fracture Area1 | Shear Fracture Area2 | Shear Fracture Area3 | Shear Fracture AreaAvg | Energy Absorbed1 | Energy Absorbed2 | Energy Absorbed3 | Energy AbsorbedAvg |
|---|---|---|---|---|---|---|---|---|---|---|---|
| A123 | 100 mm | -40°C | Longitudinal | 75% | 77% | 76% | 76% | 150 J | 155 J | 152.5 J | 152.5 J |
Microstructure
Click to see sample table
| Heat ID | Length | Temp | Direction | Grain Size1 | Grain Size2 | Grain Size3 | Grain SizeAvg | Inclusion Content1 | Inclusion Content2 | Inclusion Content3 | Inclusion ContentAvg | Phase Distribution1 | Phase Distribution2 | Phase Distribution3 | Phase DistributionAvg | Microhardness1 | Microhardness2 | Microhardness3 | MicrohardnessAvg |
|---|---|---|---|---|---|---|---|---|---|---|---|---|---|---|---|---|---|---|---|
| A123 | 10 mm | 20°C | Random | 5 | 6 | 5.5 | 5.5 | 1 | 1.5 | 1.25 | 1.25 | 50% | 52% | 51% | 51% | 250 HV | 255 HV | 252.5 HV | 252.5 HV |
Jominy End Quench Test
Click to see sample table
| Heat ID | Length | Temp | Direction | Distance from Quenched End1 | Distance from Quenched End2 | Distance from Quenched End3 | Hardness1 | Hardness2 | Hardness3 |
|---|---|---|---|---|---|---|---|---|---|
| A123 | 100 mm | 20°C | Longitudinal | 10 mm | 20 mm | 30 mm | 45 HRC | 44 HRC | 43 HRC |
Corrosion Resistance Test
Click to see sample table
| Heat ID | Length | Temp | Direction | Pitting Corrosion1 | Pitting Corrosion2 | Pitting Corrosion3 | Pitting CorrosionAvg | Intergranular Corrosion1 | Intergranular Corrosion2 | Intergranular Corrosion3 | Intergranular CorrosionAvg | Salt Spray Test1 | Salt Spray Test2 | Salt Spray Test3 | Salt Spray TestAvg |
|---|---|---|---|---|---|---|---|---|---|---|---|---|---|---|---|
| A123 | 10 mm | 20°C | Random | 5 | 6 | 5.5 | 5.5 | 2 | 2.5 | 2.25 | 2.25 | 48 hours | 50 hours | 49 hours | 49 hours |
Fatigue Test
Click to see sample table
| Heat ID | Length | Temp | Direction | Fatigue Limit1 | Fatigue Limit2 | Fatigue Limit3 | Fatigue LimitAvg | Cycles to Failure1 | Cycles to Failure2 | Cycles to Failure3 | Cycles to FailureAvg | Load Amplitude1 | Load Amplitude2 | Load Amplitude3 | Load AmplitudeAvg | Stress Ratio1 | Stress Ratio2 | Stress Ratio3 | Stress RatioAvg |
|---|---|---|---|---|---|---|---|---|---|---|---|---|---|---|---|---|---|---|---|
| A123 | 100 mm | 20°C | Longitudinal | 300 MPa | 310 MPa | 305 MPa | 305 MPa | 100000 | 110000 | 105000 | 105000 | 50 MPa | 55 MPa | 52.5 MPa | 52.5 MPa | 0.5 | 0.6 | 0.55 | 0.55 |
Weldability Test
Click to see sample table
| Heat ID | Length | Temp | Direction | Weld Strength1 | Weld Strength2 | Weld Strength3 | Weld StrengthAvg | Weld Toughness1 | Weld Toughness2 | Weld Toughness3 | Weld ToughnessAvg | HAZ Properties1 | HAZ Properties2 | HAZ Properties3 | HAZ PropertiesAvg |
|---|---|---|---|---|---|---|---|---|---|---|---|---|---|---|---|
| A123 | 100 mm | 20°C | Longitudinal | 500 MPa | 510 MPa | 505 MPa | 505 MPa | 60 J | 62 J | 61 J | 61 J | 250 HV | 255 HV | 252.5 HV | 252.5 HV |